Web Services consumer configuration
The purpose of a Web Service consumer mode configuration is to enable Activator to connect to a Web Service that is exposed by a remote provider. You can inject the data that you retrieve in the form of a Web Service response directly into Activator processing flows.
In this mode, Activator behaves as a client requesting a service from a remote server.
Overview of the configuration
To set up Activator to consume Web Services from a remote Web Service provider, you use the provider's WSDL in the Activator user interface to generate information for the exchange.
Illustration and description
The following figure illustrates schematically how Activator processes requests to remote Web Service Providers:
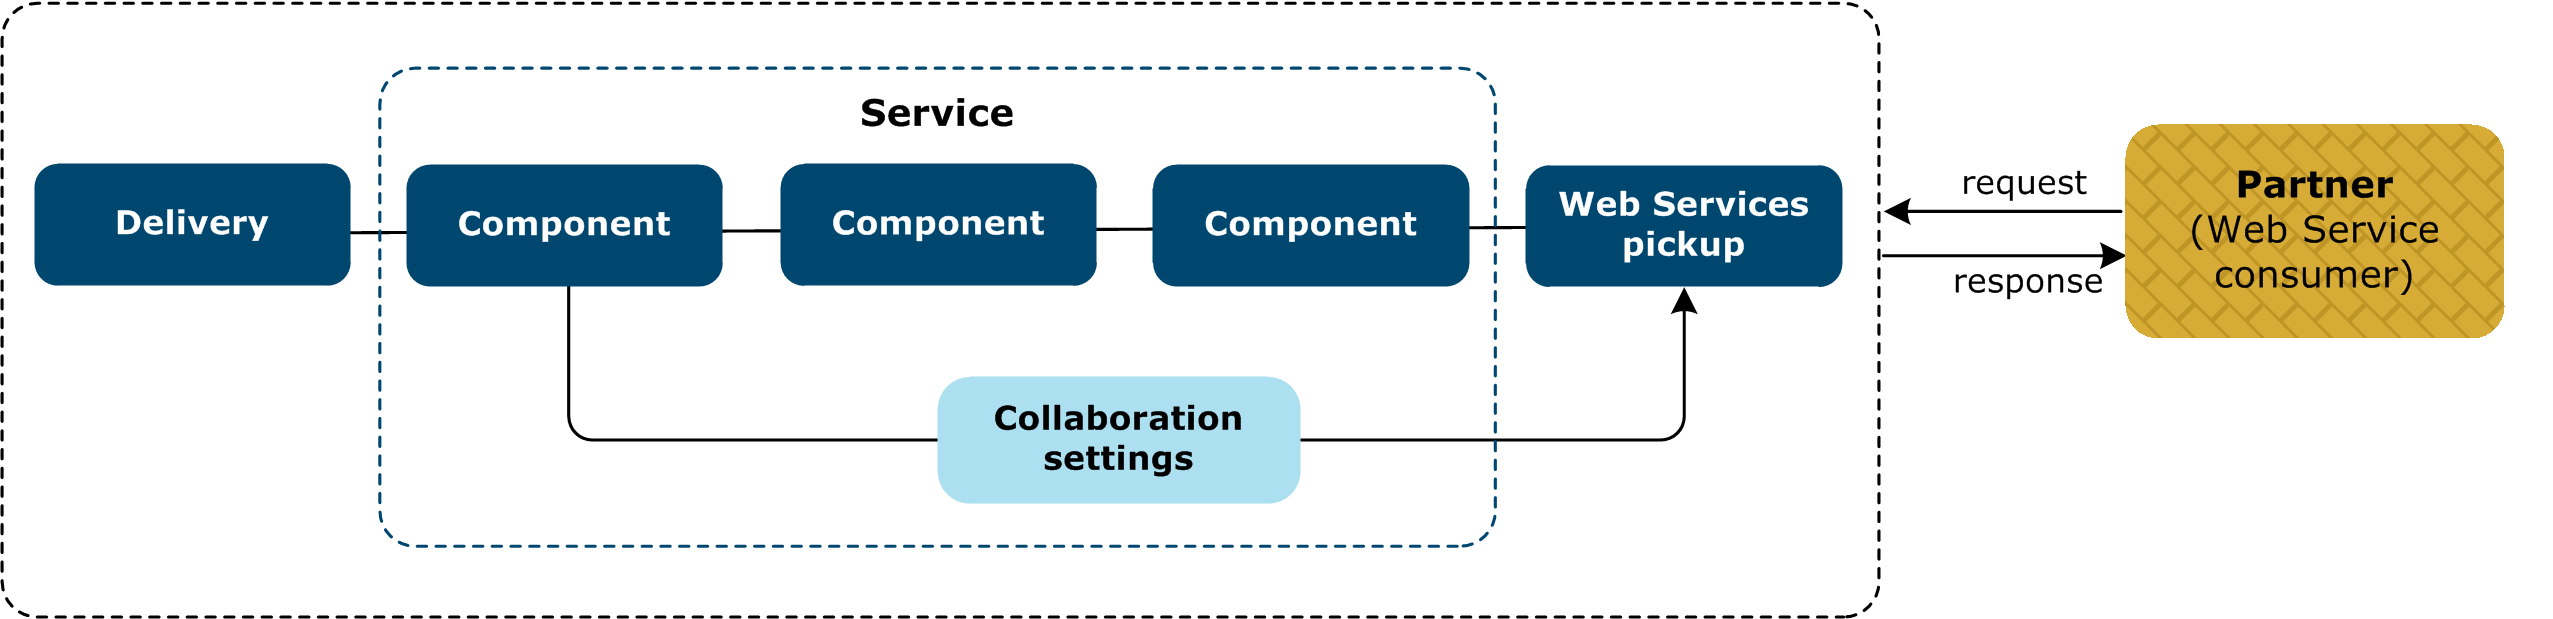
In the context of an Activator exchange between two endpoints (application or partner exchange participants), we configure a component with a Web Services map to collect data through a Web Service interface. During the message processing, Activator:
- Applies the processing of the Web Services map. This map uses the Web Services connection that is linked to the Web Services delivery.
- Opens a connection to the Web Service provider using the Web Services partner delivery.
- Applies the outbound collaboration settings to control how the Web Service request is sent to the Web Service provider partner.
- Submits the request.
- Consumes the response.
- Closes the connection to the Web Service provider.
- Continues the configured message processing of the participant-to-participant exchange (using the response).
Prerequisites
To complete the Web Service consumer configuration you require:
-
Activator, licensed for Web Services functions.
- The WSDL file for the service you want to consume.
- Optionally set validation rules for inbound web service message authentication.
- For configuration details, see Validation rules: Web Services tab.
Order of tasks
- Task 1: Add a community
- Task 2: Add a partner
- Task 3: Add a Web Service trading delivery and Web Service connection
- Web Services consumer configuration
Task 1: Add a community
Add a Community to represent your organization as a trading endpoint. See Add a community.
Task 2: Add a partner
Add a partner to represent the Web Services provider server. See Add a partner to a community.
Task 3: Add a Web Service trading delivery and Web Service connection
About this task
A trading delivery is an object that specifies how you want
your local community to send messages over the Internet to a remote
partner. For Activator Web Services consumer mode, Activator uses the Web Services trading delivery in a special way.
Activator enables you to configure message processing in such a way that you can open a connection to a Web Service provider in the course of a message-processing sequence. Activator essentially pauses message processing for the time it takes to open a connection and launch a request/response exchange with the Web Service provider. Once the requested data is obtained, Activator resumes the message processing sequence.
In order to open the Web Service connection, the processing resource calls the Web Service type trading delivery in order to use the connection information it contains.
In this Web service consumer case, the trading delivery is not used in a standard way to deliver a message at the end of message processing.
The following procedure describes how to::
- Add a trading partner delivery that enables you to request and consume services from a Web Services provider
- Add a Web Service type connection to enable a message processing component to open and use the Web Service trading delivery channel configuration.
In this procedure you are aided by a wizard that parses connectivity and message format information from the Web Service provider's WSDL.
Prerequisites
- Add a Community to represent your organization. See Add a community.
- Add a Partner to represent the Web Service provider. See Add a partner to a community.
- Obtain the Web Service Provider's WSDL, or note the URL to the Web Service, in order to retrieve the WSDL during configuration.
Procedure
- In the user interface select Partners > Manage partners to open the Partners page.
- Select the partner you want to use to represent the Web Service provider.
- On the partner graphic, click the Partner delivery icon.
- On the Partner deliveries page, click Add a delivery.
- On the Choose a message protocol page, select Web Services (HTTP) and click Next.
- On the Choose configuration type page, select Configure delivery by parsing a WSDL, if you have a WSDL file available on your file system, and click Next.
- On the same page, select one of the following:
- Browse to WSDL file – Select this option if you have a copy of the Web Service provider's WDSL on your file system. Click Chose file, and then browse and select the file.
- Retrieve WSDL from URL – Select this option if you want to retrieve the WSDL from the Web Service Provider's server. Enter the URL of the service. If the WSDL is located behind a proxy, you must also enter the proxy connection information:
- Proxy user
- Proxy password
- Proxy port
- Proxy host
- Click Next.
- On the Choose community page, select the community that represents your organization as a Web Service consumer, and then click Next. The communities you see in the drop-down list are communities that are currently linked to the partner.
- On the Processing connection page, complete the following fields and then click Next:
- Configure a new processing connection — This field is selected by default to automatically create the connection. You can de-select it if you want to manually create the connection.
- Application name — Enter a name for the processing connection or keep the default.
- Sending Party — You previously entered this name.
- Receiving party — You previously entered this name.
- SOAP action — This information comes from the Web Service.
- Request mode — Select the appropriate request mode from the drop-down list for this connection to indicate a synchronous or asynchronous call.
- Body type — Select the appropriate body type from the drop-down list for this connection.
- On the Choose transport protocol page accept the default HTTP protocol and click Next.
- On the Configure the HTTP settings page, complete the fields and then click Next:
- URL — This field is automatically populated with information parsed from the WSDL.
- Clients must use SSL to connect to this server — Select this option if you must connect to this server using SSL. If you select this option, you can also select the Enable host name verification option.
- This server requires a user name and password — Select this option if the partner's server requires this information, then complete the following fields:
- User name — Enter the client's user name.
- Password — Enter the client's password.
- Confirm password — Enter the client's password again for verification.
- On the Exchange Name page, enter a name for this delivery. This is the friendly name that is used to identify this delivery in the user interface.
- Click Finish.
After you complete this procedure
- Activator adds a trading delivery to the list of available trading deliveries.
- Activator adds a connection that refers to the delivery. To view the connection's properties, go to Processing configuration > Manage connections and click the name of the connection that you just created.
- You will use this connection in a later step to link a map type component to the trading delivery for Web Service request/response calls.
- Activator adds Web Services collaboration settings that are specific to the trading delivery. Collaboration settings specify how Activator packages the messages that a community sends to its partners. For more formation see Default collaboration fields.
Related topics