Manage roles
Roles are sets of permissions an administrator can create to define the limits of what users are allowed to do in the user interface.
The following diagram shows the high-level hierarchy of permissions you can control with roles. For detailed information about each permission within these categories, see Role permissions.
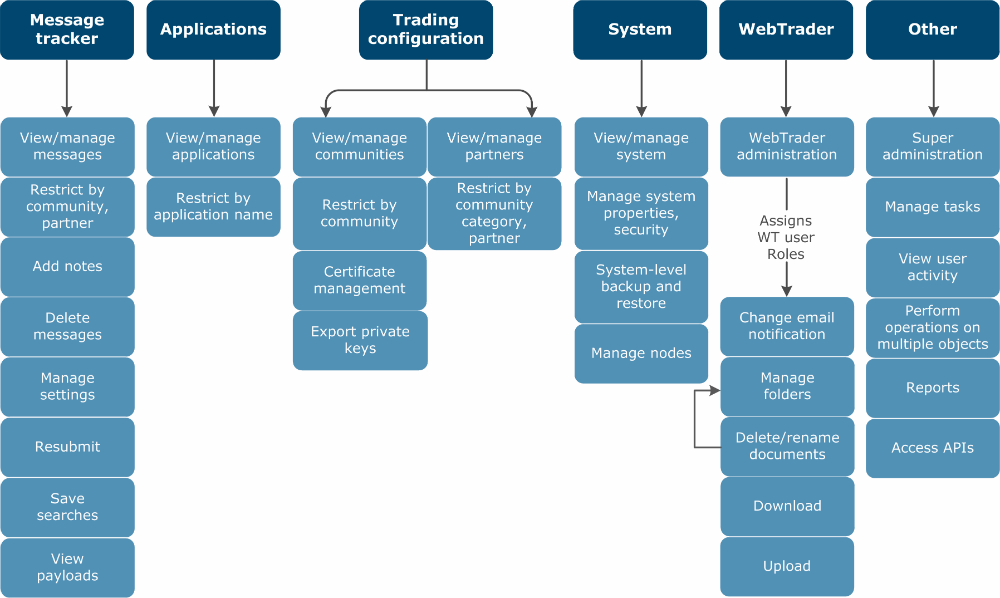
In most cases, limiting a role prevents items outside the scope of the role from appearing in the user interface. For example, if the role does not have Manage trading configuration permission, a user with that role cannot see the Add a community link. In other cases, the user sees a message stating that he or she does not have access. For example, if the role does not have View applications permission, when a user with that role clicks the Application delivery icon in the community flow diagram, the restricted access message appears.
After you create a role, you can assign it to one or more users. An administrator role typically has permissions to perform all tasks. The default system role is named "admin" and has all available permissions. You can create roles that have many or few permissions.
View available roles
From the menu bar select Users and roles > Manage roles.
The Roles page is displayed listing all available roles. To view the details of any individual role, click the name of the role in the list.
Add a role
- Select Users and roles > Add a role.
- Type a name for the role and, optionally, a description.
- Review the list of permissions and select the ones you want for the role. For a description of the permissions you can select, see Role permissions.
- Click Add this role when done.
- The new role is added to the list of roles on the Roles page.
Modify a role
- Select Users and roles > Manage roles.
- Click the name of the role to change to open the Change role page for the selected role.
- Check the characteristics of the role, by selecting and viewing the four tabs:
- Make any necessary changes and click Save changes.
Delete a role
- Select Users and roles > Manage roles.
- On the line with the name of the role to delete, click Delete.
- The role is deleted and removed from the list of roles on the Roles page.
Role permissions
When you add or change a role, you specify what type of tasks users assigned to the role are allowed to perform. To do this, you select permissions for the role from the available permissions displayed on the Permissions tab. The more permissions you select for the role, the broader the authority of that role. For an administrator role, you typically select all permissions.
The following list describes all possible permissions for roles. Depending on your user license, not all of these may be available in the user interface or applicable to your users.
- Approve CSOS orders – Allows outbound CSOS orders to be signed and verification of inbound signed CSOS orders. This permission only applies for licenses with CSOS authorization for Activator.
- Access APIs – Allows users with this permission to view, create, modify and delete trading engine resources via the Activator REST APIs. For information about REST API user, see the Activator Developer Guide.
- Execute reports – Allows generating reports. This permission has the following child permission, which applies only if the parent permission is selected.
- Manage reports – Allows using the alert activity report.
- Manage tasks – Allows display of the task list on the home page.
- Perform operations on list view objects in a single action – Allows users with this permission to execute "all-type" operations on UI pages that display lists of multiple objects. For example, a user with this permission has access to buttons and commands of the type “Delete / All”, “Copy / All”, “Change status / All”, etc.
- If the user does not have this permission, the corresponding "all-type" commands and buttons do not appear. In that case the user can still manually select every element and perform an action, but does not have the "all-type" commands.
- "All-type" commands act only on the objects that have been returned from the current user's most recent query. If the most recent search query had no filtering criteria, the "all-type" command will effectively act on all objects of the query type that exist in the database.
- Search for messages processed by the trading engine – Allows the use of Message Tracker to search for and view traded messages and information about messages. This permission has the following child permissions, which can be applied when the parent permission is selected.
- Add notes to messages – Allows users to write notes while reviewing message details in Message Tracker.
- Delete messages – Allows deleting messages in Message Tracker.
- Manage global message search settings – Allows changing settings and values on the Message Tracker global settings page.
- Restrict searching to selected communities – Allows limiting the role to specific communities. Users with this role can only search for and view data related to the specified communities. See Community restrictions for roles. For unrestricted access to all communities, do not select this.
- Restrict searching to selected partners – Allows limiting the role to specific partners. Users with this role can only search for and view data related to the specified partners. See Partner restrictions for roles. For unrestricted access to all partners, do not select this.
- Resubmit messages – Allows resubmitting messages in Message Tracker.
- Save, change and delete searches – Allows users to perform custom searches and to save and delete their own searches.
- View payloads and backups – Allows viewing backed-up copies of traded messages in Message Tracker.
- View applications – Allows viewing application pickup and delivery exchanges.
- Manage applications – Allows the modification of application pickup and delivery exchanges.
- Restrict management to selected applications – Select this option if you want to limit the Manage application permission to one or more application exchanges that you specify. Click the Restrict to applications hyperlink to open the application selection page. See Application restrictions for roles.
- Restrict viewing to selected applications – Select this option if you want to limit the View application permission to one or more application exchanges that you specify. Click the Restrict to applications hyperlink to open the application selection page. See Application restrictions for roles.
- View system status – Allows viewing the system management area of the user interface. This permission has the following child permission, which can be applied when the parent permission is selected.
- Manage system properties and security – Allows using controls in the system management area of the user interface, including managing embedded servers, certificates, and message attributes/templates.
Note:
If this permission is selected but the role is restricted from viewing communities or partners, the role still shows all community and partner certificates in the Manage certificates list, but prevents users from accessing the details links.
- Perform system level backup and restore operations – Allows system backup and restore.
- View trading configuration – Allows viewing communities.
- Manage trading configuration – Enables adding and modifying communities.
- Note: You must normally use the Manage partners configuration and Manage trading configuration settings together for the desired result. Manage partners configuration enables adding a partner, but a user needs Manage trading configuration to assign a partner to a community. A user can delete a partner assigned to a community only when associated with a role enabling both settings. Only Manage partners configuration is needed to delete a partner not assigned to any community. A user can change the community of a partner only when associated with a role enabling both settings. This permission has the following child permissions, which apply only if the parent permission is selected.
- Add, modify, export, and delete community and server certificates – Can be selected only when Manage trading configuration also is selected. Allows the users with this role to manage certificates owned by communities as well as server certificates. This has the following child permission:
- – Export private key from any certificate with a private key – Allows users of the trading engine to export private encryption keys when exporting certificates to files. See Export a certificate to a file and Globally prohibit exporting private keys.
- Restrict management to selected communities – Select this option if you want to limit the Manage trading configuration permission to one or more communities that you specify. Click the Restrict to selected communities hyperlink to open the community selection page. See Community restrictions for roles.
- Restrict viewing to selected communities – Select this option if you want to limit the View trading configuration option to one or more communities that you specify. Click the Restrict to selected communities hyperlink to open the community selection page. See Community restrictions for roles.
- View partners configuration – Allows viewing partners.
- Manage partners configuration – Enables adding and changing partners.
- Add, modify, export, and delete partner certificates – Allows the role to manage trading partner certificates.
- Restrict management to selected partners – Select this option if you want to limit the Manage partners configuration permission to one or more partners that you specify. Click the Restrict to selected communities hyperlink to open the community selection page. See Partner restrictions for roles.
- Restrict viewing to selected partners – Select this option if you want to limit the View partners configuration permission to one or more partners communities that you specify. Click the Restrict to selected communities hyperlink to open the community selection page. See Partner restrictions for roles.
- View user activity – Allows viewing of user and roles area of the user interface. This permission has the following child permission.
- Administrator – This is the single most powerful permission. A user assigned to a role with this permission has unlimited permissions, regardless of other permissions selected. When this permission alone is selected, users with this role can perform all tasks and navigate to all areas in the user interface. Select this permission only for a role for administrators.
Partner restrictions for roles
When adding or changing a role, you can give users broad or narrow access to partners of your Activator communities. This is done by specifying partners on the Partner restrictions tab. You can define by role the partner data users can search for and view in Message Tracker. For users with administrator authority, you can limit the partners the administrators can change.
Partner restrictions take effect when one or more of the following is selected on the Permissions tab:
- Search for messages processed by Activator > Restrict searching to selected partners
- Manage partners configuration > Restrict management to selected partners
- View partners configuration > Restrict viewing to selected partners
The conditions set on the Partner restrictions tab apply equally to both of these role permissions. If you want partner restrictions to be identical for searching in Message Tracker and managing partners, select both. If you want partner restrictions to be different for both permissions, set up two roles.
The Partner restrictions tab has two general conditions. These can be further refined with other filtering conditions on the tab’s three sub-tabs.
The general conditions are:
- Limit this role to the partner selections and permissions indicated below – Users assigned to the role can access information only for the partners selected on the sub-tabs. Select this if you want the role to have access only to a limited number of partners. Specify the exceptions on the Communities, Categories or Partners sub-tabs.
- If you select this and do not specify any exceptions on the sub-tabs, the effect is the role does not have access to any partners.
- Apply this role to all partners except for those selected with the permissions indicated below – Users assigned to the role can access information for all partners with the exception of the partners selected on the sub-tabs. Select this if you want the role to have access to many partners, except for a specified few. Specify the exceptions on the Communities, Categories or Partners sub-tabs.
- If you select this and do not specify any exceptions on the sub-tabs, the effect is the role has access to all partners.
You can use one or more of the Partner restriction tab’s sub-tabs to select partners. The effects of the sub-tabs are cumulative. For instance, if you select community A on the Communities sub-tab and partners C and D on the Partners sub-tab, all partners of community A as well as partners C and D — regardless whether C and D belong to community A — are affected.
If you do not make any selections on the sub-tabs, this has the effect of denying access to all partners.
If you need help setting up partner categories to use the Categories sub-tab, see Group partners by categories.
See Manage multiple partner-restricted roles and Role permissions.
Manage multiple partner-restricted roles
The system allows assigning multiple roles to a user. In the case of roles with partner restrictions, limits are applied in an cumulative sense. For instance, as the system builds the list of allowed partners, the roles can only add partners to the list, but not take them away. This way the roles can be applied in any order. The examples in the following table show the effect of assigning multiple roles with different partner restrictions.
|
Partner A
|
allows
|
does not allow
|
access granted
|
|
Partner B
|
does not allow
|
allows
|
access granted
|
|
Partner C
|
does not allow
|
does not allow
|
access denied
|
|
Partner D
|
allows
|
allows
|
access granted
|
Application restrictions for roles
When you add or change a role, you can specify the application pickup and delivery exchanges that the users who are assigned the role can view and modify. To do this, you specify application exchanges on the Application restrictions tab.
Application exchange restrictions take effect when you select one or more of the following on the Permissions tab:
- Manage applications > Restrict management to selected applications
- View applications > Restrict viewing to selected applications
The conditions you set on the Application restrictions tab apply equally to both of these role permissions. If you want the application restrictions on a role to be identical for viewing and modifying application exchanges, you select all of the options. If you want different groups of users to have application restrictions that are different for a single application exchange (or group of application exchanges), you must set up more than one role.
The Application restrictions tab has two general conditions:
- Limit this role to the application selections and permissions indicated below – Users assigned to the role can access information only for the application exchanges that are selected on the tab. Select this option if you want the role to have access only to a limited number of application exchanges that you specify in the tab.
- Note: If you select this option, but do not specify any application exchanges, the role does not have access to any application exchanges.
- Apply this role to all applications except for those selected with the permissions indicated below – Users assigned to the role can access information for all application exchanges, with the exception of the application exchanges selected on this tab. Select this option if you want the role to have access to many application exchanges, except for a few that you specify.
- Note: If you select this option, but do not specify any excepted application exchanges, the role has access to all application exchanges.
The following table lists common tasks related to applications that users may need to perform and the role permissions that apply.
| View the list of applications |
View applications; filtered based on any restrictions you configure. |
| View the details of an application |
View applications; limited based on any restrictions you configure. |
| Modify an application |
Manage applications; limited based on view and manage restrictions. |
| Change the state of an application |
Manage applications; limited based on view and manage restrictions. |
| Delete an application |
Manage applications; limited based on view and manage restrictions. |
| Add an application |
Manage applications; not allowed if restrictions on managing applications are configured. |
| Create a new embedded server |
Manage trading configuration. Not affected by restrictions.
|
| View the details of an embedded server |
View trading configuration. Not affected by restrictions.
|
| View the list of trusted root certificates |
View applications. Not affected by restrictions. |
| Trust and un-trust root certificates |
Add, modify, export, and delete community and server certificates. Not affected by restrictions.
|
The following table lists tasks related to application users (such as an FTP user) and the role permissions that apply.
| View the list of application users |
View applications. If application restrictions are configured, the main lists of application users (such as the Application FTP users page) are not visible. |
| Add a new application user |
Manage applications. Can add new users only on applications that are within their Manage restrictions. |
| Delete an application user |
Manage applications. Not affected by Manage restrictions, but not possible to do if View applications restrictions are configured, or if the user is in use by an application. |
| Modify an existing application user |
Manage applications. Not affected by Manage restrictions, but not possible to do if View applications restrictions are configured. |
| Change which user is assigned to an application (and which directory they use) |
Manage applications. Can change users only on applications that are within their Manage restrictions. |
| View the keys for an application SFTP user |
View applications. Not affected by Manage restrictions, but not possible to do if View applications restrictions are configured. |
| Add/remove keys for an SFTP user |
Manage applications. Not affected by Manage restrictions, but not possible to do if View applications restrictions are configured. |
| Access password policy details |
View trading configuration. Not affected by restrictions.
|
Community restrictions for roles
When you add or change a role, you can specify the communities that the users who are assigned the role can search, view, and manage. To do this, you specify communities on the Community restrictions tab.
Community restrictions take effect when you select one or more of the following permissions on the Permissions tab:
- Search for messages processed by the trading engine > Restrict searching to selected communities
- Manage trading configuration > Restrict management to selected communities
- View trading configuration > Restrict viewing to selected communities
The conditions you set on the Community restrictions tab apply equally to any of the role permissions that are listed in the above list. If you want the community restrictions on a role to be identical for searching, managing, and viewing communities, you select all of the options. If you want different groups of users to have community restrictions that are different for a single community (or group of communities), you must set up more than one role.
If you set up community restrictions so that a role has access to Community A but is restricted from viewing Community B, the role allows users to see messages between the two communities.
The Community restrictions tab has two general conditions:
- Limit this role to the community selections and permissions indicated below – Users assigned to the role can access information only for the communities that are selected on the tab. Select this option if you want the role to have access only to a limited number of communities that you specify.
- Note: If you select this option, but do not specify any communities, the role does not have access to any communities.
- Apply this role to all communities except for those selected with the permissions indicated below – Users assigned to the role can access information for all communities, with the exception of the communities selected on this tab. Select this option if you want the role to have access to many communities, except for a few that you specify.
- Note: If you select this option, but do not specify any excepted communities, the role has access to all communities.
Related topics