Web Services collaboration settings
Use community collaboration settings to control how outbound Web Services messages are sent to partners.
The collaboration settings you set at the level of a partner delivery override any other level of delivery settings (default, community, category).
Web Services collaboration settings exist for each community/partner pair that are linked through a Web Services partner delivery.
If you created a Web Services partner delivery using the WSDL parsing wizard, the collaboration settings were automatically generated for community/partner pair. For more information, see Add a Web Services trading delivery.
View and modify settings
To view the collaboration settings that control sending of messages to a Web Services partner:
- In the user interface, from the Trading configuration menu select Manage trading configuration to open the Communities page.
- Select the community you use for Web Service exchanges.
- On the community map of the community summary page, click the Collaboration settings icon.
- In the left panel, the interface displays a tree structure that shows a node for each partner that is linked to the community and a child node for each delivery exchange that is defined between the partner and the community. For example:
-
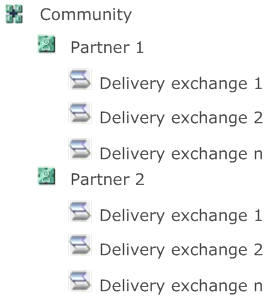
- Note: To view the URL that is associated with a delivery exchange in this list, hover the mouse over the delivery exchange name in the tree.
- Select the partner delivery for which you want to view the settings.
- In the right pane, select the categories of settings you want to view or modify for this delivery. You can choose as many categories as you want. The following categories may have an impact on Web Service outbound messages:
- Pick the sender routing ID
- Pick the receiver routing ID
- Set sending rules for the WebServices message protocol
- Set resend attempts and interval for reliable messaging
- Specify the signing certificate to use
- Specify the receipt signing certificate to use
- Specify the partner's encryption certificate to use
- Specify whether to encrypt or sign messages and choose algorithms
- Specify the delivery exchange to send messages to
- The interface displays the settings for the categories you select. You can modify these settings.
- After making any modifications, click Save Changes.
Web Services related settings
Sender routing ID
From the drop-down box, select the sender routing ID to use.
Receiver routing ID
From the drop-down box, select the receiver routing ID to use.
Web Services
| Send handler config file |
Name of the file in the <install directory>\conf directory used when packaging
a message.
Activator provides two versions of the Axis2 file:
axis2.xml - This file has handlers for adding routing information to the SOAP header and interpreting routing information. If you want to use WS-addressing you must use this file.
axis2NoWSAddressing.xml - This file disables WS-Addressing. If you do not want to use WS-addressing, select this file.
You can create a customized version of this file for outbound messages, however, doing so requires
the aid of a professional services consultant, or obtaining the
optional Software Development Kit, or both.
|
| Payload location |
Select an option:
- SOAP
body (default)
- MIME attachment
- None – Setting the payload
location to none has the effect of not attaching the payload as
an attachment or in the SOAP body. In this case, a SOAP
handler must be configured to attach the payload where
desired.
|
| SOAP action |
The SOAP action header value. If specified for outbound
messages, the value is used when packaging. If no value is
specified, SOAPAction defaults to a blank string. |
| SOAP version |
Select a version for the outbound call:
This setting is overwritten by any metadata specifying a SOAP version that is linked to a message that is being handled.
|
| Encrypt messages |
Select this option to encrypt outbound messages
When you select this option, you can also select the following options:
- Encrypt attachments
- Encrypt SOAP body
- Xpaths to encrypt – Click Add to specify one or more xPaths
- ID refs to encrypt – Click Add to specify one or more ID refs
|
| Sign messages |
Select this option to digitally sign the messages you send.
When you select this option, you can also select the following options:
- Sign attachments
- Sign SOAP body
- Xpaths to sign – Click Add to specify one or more xPaths
- ID refs to sign – Click Add to specify one or more ID refs
|
| Use MTOM to encode messages |
Select this option to specify parts of the payload to use
Message Transmission Optimization Mechanism (MTOM)
encoding of outbound messages. This is base 64-encoding for
preserving the integrity of non-ASCII parts of payloads (for
example, blank spaces). To use MTOM encoding of outbound messages, the receiving partner must be able to auto-detect the encoded parts and decode them.
The transaction engine auto-detects and decodes such messages when it receives payloads from partners.
When you select this option, you can also select the following options:
- Xpaths to encode – Click Add to specify one or more xPaths
- ID refs to encode – Click Add to specify one or more ID refs
|
| Use username token when sending |
Select this option to require that messages sent via the Web Services
delivery contain a UsernameToken element in the
SOAP header. The Username token element includes the user name and
password specified below.
- Use password digest in place of plain text during authentication – Select this option to have Activator convert the password to
digest form. The digest is a hash of the password that is base
64-encoded.
- User name – Enter the user name
- Change password
|
| Enable web service reliable messaging |
Select this option to enable reliable messaging on outbound messages to this partner.
When you select this option, you can also select the following option:
- Enable WebServices reliable messaging anonymous addressing
|
Resend attempts
| Resend attempts |
The maximum number of resend attempts allowed. |
| Resend interval in minutes |
Interval between resend attempts. |
Signing certificate
From the drop-down list of available certificates, select the certificate to use to sign outbound messages to this partner.
Receipt signing certificate
From the drop-down list of available certificates, select the certificate to use for signing receipts to this partner.
Partner encryption certificate
From the drop-down list of available certificates, select the certificate to use for encrypting files sent to this partner.
Specify the delivery to send messages to
From the drop-down list, select the delivery to use in the event that there is no delivery point that matches the default delivery for this partner.
Related topics